
Linux Shell Hacks and Notes
- commands are just what is used to navigate linux terminal
echo- prints statementsapt- “advanced package tool” used to install various files that are onlineif/else- these statements can be used in terminal too, to check if something is fulfilled-v/-version/--version- can be used to check the versions of what is installed, useful for debugginggit- universal for any commands used for doing things with githubgem- universal for install dependencies that are used by ruby
Making Script File
Scripts can be made in order to install different things and also manipulate different things that are in Linux through the terminal. In order to make an executable script you can run:
nano <filename>.sh- makes the file and allows you to add the code into that script, once done you can exitctrl+x- used to exit the nano file and allows you to save it
At this point your file is made but not executable so in order to make it executable you can:
chmod +x <filename>.sh- this changes the permissions of the file in order to make it executable
After doing this you can run the file by running:
./<filename>.sh- this basically open the file, however instead of entering the file, it runs the code inside the file
1
2
3
4
5
6
7
8
9
10
11
12
13
14
15
16
17
18
19
20
21
22
23
24
25
26
27
28
29
30
31
32
33
34
35
36
37
38
39
40
41
42
43
44
45
46
47
48
49
50
51
52
53
54
55
%%script bash

echo "Finding Ubuntu Version:"
lsb_release -a
echo

echo "Getting Github Info:"
git config --global --get user.name
git config --global --get user.email
echo

echo "Testing Python:"
if command -v python3 &>/dev/null; then
    echo "Python is already installed."
    python3 --version
else
    echo "Installing Python..."
    sudo apt install -y python3
fi
echo

echo "Testing Ruby:"
if command -v ruby &>/dev/null; then
    echo "Ruby is already installed."
    ruby -v
else
    echo "Installing Ruby..."
    sudo apt install -y ruby-full build-essential zlib1g-dev
fi
echo

echo "Testing Jupyter:"
if command -v jupyter-notebook &>/dev/null; then
    echo "Jupyter is already installed."
    jupyter --version
    jupyter kernelspec list
else
    echo "Installing Jupyter..."
    sudo apt-get install -y jupyter-notebook
fi
echo

echo "Testing Bundler:"
if command -v jekyll bundler &>/dev/null; then
    echo "Bundler is already installed."
    bundler --version
else
    echo "Installing Bundler..."
    export GEM_HOME="$HOME/gems"
    export PATH="$HOME/gems/bin:$PATH"
    echo 'export GEM_HOME="$HOME/gems"' >> ~/.bashrc
    echo 'export PATH="$HOME/gems/bin:$PATH"' >> ~/.bashrc
    gem install jekyll bundler
fi
echo
1
2
3
4
5
6
7
8
9
10
11
12
13
14
15
16
17
18
19
20
21
22
23
24
25
26
27
28
29
30
31
32
33
34
35
36
37
38
39
40
41
42
43
44
45
46
47
Finding Ubuntu Version:


No LSB modules are available.


Distributor ID:	Ubuntu
Description:	Ubuntu 20.04.6 LTS
Release:	20.04
Codename:	focal

Getting Github Info:
DavidVasilev1
davidkvasilev@gmail.com

Testing Python:
Python is already installed.
Python 3.9.12

Testing Ruby:
Ruby is already installed.
ruby 3.0.5p211 (2022-11-24 revision ba5cf0f7c5) [x86_64-linux]

Testing Jupyter:
Jupyter is already installed.
Selected Jupyter core packages...
IPython          : 8.2.0
ipykernel        : 6.9.1
ipywidgets       : 7.6.5
jupyter_client   : 6.1.12
jupyter_core     : 4.9.2
jupyter_server   : 1.13.5
jupyterlab       : 3.3.2
nbclient         : 0.5.13
nbconvert        : 6.4.4
nbformat         : 5.3.0
notebook         : 6.4.8
qtconsole        : 5.3.0
traitlets        : 5.1.1
Available kernels:
  bash          /home/davidv/.local/share/jupyter/kernels/bash
  javascript    /home/davidv/.local/share/jupyter/kernels/javascript
  python3       /home/davidv/.local/share/jupyter/kernels/python3

Testing Bundler:
Bundler is already installed.
Bundler version 2.2.33
Github Pages and Chirpy
I chose to use the Github Pages Chirpy Theme for my blog, as the interface of it is really nice for blogging and the organization is really good. I customized the Archives tab and the Categories tab in order to organize my posts better. Below are how I changed the code.
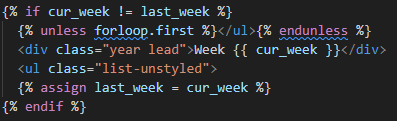
Modifying Archives
In here, all I did was change the year to week, and in each post I added a week variable in the front matter. This allows me to organize my posts based on week so that when I go to the archives tab, I can see the posts and then the week they are under. I also changes the CSS to the year class in order to remove the open dot that denotes a main category and then I also improved the spacing between the timeline line and then week heading in order to make it more visually appealing.
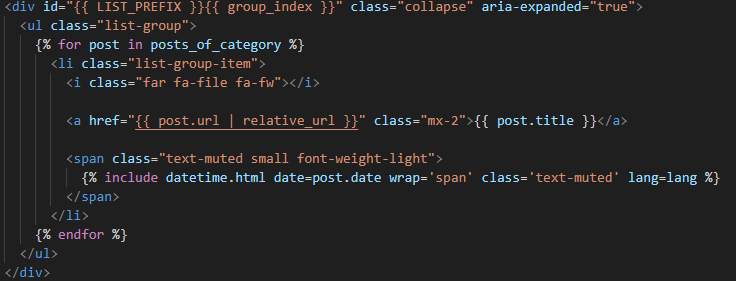
Modifying Categories
In here I changed the sub-categories to posts in order to organize the posts under the categories instead of organizing subcategories under the categories. This allows me to have all of my posts organized in one place and they will render as I update the site, so that if I need to find my Lab Notebooks or if I need to find a Lesson, I can look at it under the categories page.
Modifying Theme
In order to modify the theme, I changed the variables of the light and dark mode files. This was done by selecting a color that I liked and then changing the shade of the color in order to get the desired results.
1
2
3
4
5
6
7
8
9
10
11
12
13
14
15
16
17
18
19
@mixin dark-scheme {
  /* Framework color */
  --main-bg: #130f21;
  --mask-bg: #2f2944;
  --main-border-color: rgb(44, 45, 45);

  /* Common color */
  --text-color: rgb(175, 176, 177);
  --text-muted-color: rgb(125, 136, 146);
  --heading-color: #cccccc;
  --label-color: #a4a4c2;
  --blockquote-border-color: rgb(66, 66, 66);
  --blockquote-text-color: #868686;
  --link-color: #908bde;
  --link-underline-color: rgb(82, 108, 150);
  --button-bg: rgb(39, 40, 43);
  --btn-border-color: rgb(63, 65, 68);
  --btn-backtotop-color: var(--text-color);
  --btn-backtotop-border-color: var(--btn-border-color);
i also learned about ::before and ::after in css, which allow for styling elements to be inserted before and after the content they are addressed to. this allows for changing styles for buttons and other things. children in css are elements that are addressed to one class and generated as more are needed. this allows for less code and faster processing with iteration.
1
2
3
4
5
6
7
8
9
10
11
12
13
14
15
16
17
18
19
20
21
22
23
24
25
26
27
28
29
30
31
32
33
34
35
36
37
38
.year {
  height: 3.5rem;
  font-size: 1.5rem;
  position: relative;
  left: -16px;
  margin-left: -$timeline-width;

  &::before {
    @extend %timeline;

    height: 72px;
    left: 97px;
    bottom: 16px;
  }

  &:first-child::before {
    @extend %timeline;

    height: 32px;
    top: 24px;
  }

  /* Year dot */
  // &::after {
  //   content: '';
  //   display: inline-block;
  //   position: relative;
  //   border-radius: 50%;
  //   width: 12px;
  //   height: 12px;
  //   left: 21.5px;
  //   border: 3px solid;
  //   background-color: var(--timeline-year-dot-color);
  //   border-color: var(--timeline-node-bg);
  //   box-shadow: 0 0 2px 0 #c2c6cc;
  //   z-index: 1;
  // }
}
Rendering IPYNB Notebooks
in order to render the ipynb notebooks, a python script can be used in order to convert the notebooks into .md files which can be then rendered onto the final website. this is done with a function that reads through the notebook and using predefined variables and functions that read through the file and convert everything to markdown or code segments. front matter is also converted in order to give the necessary variable to jekyll to render the page. the converted .md file is then sent to the _posts directory.
1
2
3
4
5
6
7
8
9
10
11
12
13
14
15
16
17
18
19
20
21
22
23
24
25
26
27
28
def convert_notebook_to_markdown_with_front_matter(notebook_file):
    # Load the notebook file
    with open(notebook_file, 'r', encoding='utf-8') as file:
        notebook = nbformat.read(file, as_version=nbformat.NO_CONVERT)

        # Extract front matter from the first cell
        front_matter = extract_front_matter(notebook_file, notebook.cells[0])

        # Remove the first cell from the notebook
        notebook.cells.pop(0)

        # Convert the notebook to Markdown
        exporter = MarkdownExporter()
        markdown, _ = exporter.from_notebook_node(notebook)

        # Prepend the front matter to the Markdown content
        front_matter_content = "---\n" + "\n".join(f"{key}: {value}" for i in range(len(front_matter)) for key, value in front_matter[i].items()) + "\n---\n\n"
        markdown_with_front_matter = front_matter_content + markdown

        # Generate the destination Markdown file name by replacing the extension
        destination_file = os.path.basename(notebook_file).replace(".ipynb", ".md")

        # Generate the destination path
        destination_path = os.path.join(destination_directory, destination_file)

        # Write the converted Markdown file
        with open(destination_path, "w", encoding="utf-8") as file:
            file.write(markdown_with_front_matter)
Calculator with HTML, CSS, and JS
Stored Data