CORS
Cross-Origin Resource Sharing (CORS) is a security feature implemented by web browsers to control how web pages in one domain can request and interact with resources from another domain. corserror
- CORS is a set of rules that enable or restrict cross-origin (cross-site) HTTP requests made by scripts running on a web page.
- It helps to prevent potentially harmful requests and enhances web security which is why it is so important
Implementation on the Backend
- MvcConfig.java
1
2
3
4
5
6
7
8
9
10
11
12
13
14
15
16
17
18
19
20
21
22
23
24
25
26
27
28
package com.nighthawk.spring_portfolio;
import org.springframework.context.annotation.*;
import org.springframework.web.servlet.config.annotation.*;

@Configuration
public class MvcConfig implements WebMvcConfigurer {

    // This method sets up a custom index page for the "/login" path
    // Defines how the login page is accessed within app
    @Override
    public void addViewControllers(ViewControllerRegistry registry) {
        registry.addViewController("/login").setViewName("login");
    }

    // Configures the location for uploaded files outside the app's resources
    // CRUCIAL for file upload functionality -> make sure files stored and can be accessed properly by frontend
    @Override
    public void addResourceHandlers(final ResourceHandlerRegistry registry) {
        registry.addResourceHandler("/volumes/uploads/**").addResourceLocations("file:volumes/uploads/");
    }

    // Sets up CORS settings --> allows requests from specified origins
    // This case is GitHub Pages site & local dev site
    @Override
    public void addCorsMappings(CorsRegistry registry) {
        registry.addMapping("/**").allowedOrigins("https://nighthawkcoders.github.io", "http://localhost:4000");
    }
}
- Securityconfig.java
1
2
3
4
5
6
7
8
9
10
11
12
13
14
15
16
17
18
19
20
21
22
23
24
25
26
27
28
29
30
31
32
33
34
35
36
37
38
39
40
41
42
43
44
45
46
47
48
49
50
51
52
53
54
55
56
57
58
59
60
61
62
63
64
65
66
67
68
69
70
71
72
73
74
75
76
77
78
79
// Configure security settings for Spring app

@Configuration
@EnableWebSecurity  // Enable basic Web security features
@EnableMethodSecurity(prePostEnabled = true)
public class SecurityConfig {

    @Autowired
	private JwtAuthenticationEntryPoint jwtAuthenticationEntryPoint;

	@Autowired
	private JwtRequestFilter jwtRequestFilter;

	@Autowired
	private PersonDetailsService personDetailsService;

    // @Bean  // Sets up password encoding style
    PasswordEncoder passwordEncoder(){
        return new BCryptPasswordEncoder();
    }

	// Configures the authentication manager to load user details
	@Autowired
	public void configureGlobal(AuthenticationManagerBuilder auth) throws Exception {
		auth.userDetailsService(personDetailsService).passwordEncoder(passwordEncoder());
	}

	@Bean
	public AuthenticationManager authenticationManager(AuthenticationConfiguration authenticationConfiguration) throws Exception {
		return authenticationConfiguration.getAuthenticationManager();
	}

    // Configure security settings, including CORS
		@Bean
		public SecurityFilterChain filterChain(HttpSecurity http) throws Exception {
			http
				.csrf(csrf -> csrf
					.disable()
				)
				// List the requests/endpoints that need to be authenticated
				.authorizeHttpRequests(auth -> auth
					.requestMatchers("/authenticate").permitAll()
					.requestMatchers("/mvc/person/update/**", "/mvc/person/delete/**").authenticated()
					.requestMatchers("/api/person/post/**", "/api/person/delete/**").authenticated()
					.requestMatchers("/**").permitAll()
				)
				// CORS support is enabled within the security configuration
				.cors(Customizer.withDefaults())
				// Set up specific headers related to CORS
				// Ensure that the necessary headers are included in the HTTP responses
				.headers(headers -> headers
					.addHeaderWriter(new StaticHeadersWriter("Access-Control-Allow-Credentials", "true"))
					.addHeaderWriter(new StaticHeadersWriter("Access-Control-Allow-ExposedHeaders", "*", "Authorization"))
					.addHeaderWriter(new StaticHeadersWriter("Access-Control-Allow-Headers", "Content-Type", "Authorization", "x-csrf-token"))
					.addHeaderWriter(new StaticHeadersWriter("Access-Control-Allow-MaxAge", "600"))
					.addHeaderWriter(new StaticHeadersWriter("Access-Control-Allow-Methods", "POST", "GET", "OPTIONS", "HEAD"))
					//.addHeaderWriter(new StaticHeadersWriter("Access-Control-Allow-Origin", "https://nighthawkcoders.github.io", "http://localhost:4000"))
				)
				.formLogin(form -> form
					.loginPage("/login")
				)
				.logout(logout -> logout
					.logoutRequestMatcher(new AntPathRequestMatcher("/logout"))
					.logoutSuccessUrl("/")
				)
				.exceptionHandling(exceptions -> exceptions
					.authenticationEntryPoint(jwtAuthenticationEntryPoint)
				)
				// Configures the session management to use a stateless approach--> Server does not store session information on the server-side between requests --> all the necessary information for authentication is contained within each request
				// Pro: more scalable, servers can handle requests independently
				.sessionManagement(session -> session
					.sessionCreationPolicy(SessionCreationPolicy.STATELESS)
				)
				// Add a filter to validate the tokens with every request
				.addFilterBefore(jwtRequestFilter, UsernamePasswordAuthenticationFilter.class);
			return http.build();
	}
}
DotEnv
- DotEnv is the use of a .env file within a project to handle sensitive data, including API keys and database credentials.
- The term “dotenv” is frequently associated with a specific library or tool that integrates these variables into the application’s environment.
- Its core objective is to refrain from putting confidential information, like access tokens, directly into the source code or version control. Instead, such details are put in the .env file, customized for each distinct environment.
DotEnv in relation to JWT
- JWTs are digitally signed using either a secret (HMAC) or a public/private key pair (RSA or ECDSA) which safeguards them from being modified by the client or an attacker jwt
- Using a .env file, you can store your JWT secret key and keep sensitive information secure.
Implementation
- Navigate to your project’s root directory using the command line: example -
cd /home/aliyatang/vscode/aliyablog - Initialize a new package.json file for your project:
npm init -y - Install dotenv
npm install dotenv - create .env file in root of project, in this file set jwt secret key: example -
jwt_secret=your_secret_key - make a .js file, require and configure dotenv so you can load variables from .env file into process.env:
require('dotenv').config() - whenever you need to sign or verify jwt, use the secret from the environment variables, keep key secure and easily configureable:
const jwtsecret = process.env.jwt_secret;
Good Practices
- Never commit
.env, always keep.envin.gitignore, to prevent it being pushed to version control - Reguarly rotate secret keys for good security
Instance Directory
- Purpose
- Stores instance specific data
- ie: configuration files, logs, any data that is specific to that instance.
- This idea becomes vital when multiple instances are being used simutaneously.
- Having a separate instance directory ensures that configurations and instance data don’t get mixed up.
- Stores instance specific data
Database
- Purpose
- Stores persistent data for the application.
- Can be SQL or NoSQL.
- ie: MySQL, PostgreSQL, MongoDB, Redis.
- Critical for managing transactions, authentication, and more.
Mini-Guide: Deploying Your Site with AWS
Important Requirements: Must have a backend that runs locally and have a domain name pointing to the Public IP of your deployment server using AWS Route 53
AWS EC2 Access
- Login to AWS Console:
- Access AWS Management Console
- Navigate to “EC2” and select “Instances.”
- Instance Selection:
Server Setup
- AWS EC2 Terminal:
- Setup the server environment and fetch the project code
- Clone your backend repo:
git clone github.com/server/project.git your_repo - Navigate to the repo:
cd your_repo
Application Setup
- Finding Port:
- Run
docker pson AWS EC2 terminal to find which ports are already taken - This allows you to identify an available port for the application, choose one that is not taken
- Run
- Docker Setup:
- Before configuring your Dockerfile, ensure that Docker is installed (for our class, it is already installed but it is good practice to verify it)
- Open a terminal and run the following command to check the docker version:
docker --version - Verify the port you found after running docker ps is matched in your Dockerfile and docker-compose.yml
What your Dockerfile should look like
1
2
3
4
5
6
7
8
9
# syntax=docker/dockerfile:1
FROM openjdk:18-alpine3.13
WORKDIR /app
RUN apk update && apk upgrade && \
    apk add --no-cache git
COPY . /app
RUN ./mvnw package
CMD ["java", "-jar", "target/spring-0.0.1-SNAPSHOT.jar"]
EXPOSE 8---
What your docker-compose.yml should look like
1
2
3
4
5
6
7
8
9
10
version: '3'
services:
  web:
    image: your_image_name
    build: .
    ports:
      - "8---:8085"
    volumes:
       - ./volumes:/volumes
    restart: unless-stopped
- Once the ports match, test your setup by running
docker-compose up -dto build your website - run
curl localhost:8---to check if your build was successful
DNS & NGINX Setup
- Route 53 DNS:
- Configure DNS for domain mapping
- Set up DNS subdomain for your backend server in AWS Route 53
- Emaad will go over this in-depth later
- NGINX Configuration:
- Navigate to
/etc/nginx/sites-availablein the terminal - Create an NGINX config file and configure it accordingly
- Configure NGINX as a reverse proxy for the application
- Navigate to
What your NGINX config file should look like
1
2
3
4
5
6
7
8
9
10
11
12
13
14
15
16
17
server {
    listen 80;
     listen [::]:80;
     server_name -----.stu.nighthawkcodingsociety.com ; # change server name to your domain
     location / {
         proxy_pass http://localhost:8000; # change port to yours
         if ($request_method ~* "(GET|POST|PUT|DELETE)") {
                 add_header "Access-Control-Allow-Origin"  *;
         }
         if ($request_method = OPTIONS ) {
                 add_header "Access-Control-Allow-Origin"  *; # make stricter
                 add_header "Access-Control-Allow-Methods" "GET, POST, PUT, DELETE, OPTIONS, HEAD"; # request methods above match here
                 add_header "Access-Control-Allow-Headers" "Authorization, Origin, X-Requested-With, Content-Type, Accept";
                 return 200;
         }
     }
 }
- Validation and Restart:
- Create a symbolic link to /etc/nginx/sites-enabled:
ln -s /etc/nginx/conf-available/your-server-name /etc/nginx/conf-enabled - Validate with
sudo nginx -t - Restart NGINX:
sudo systemctl restart nginx - Test your domain on your desktop browser (http://)
- These commands allow you to validate your NGINX configuration and restarts for changes to take effect
- Create a symbolic link to /etc/nginx/sites-enabled:
Certbot Configuration
- Run Certbot:
- Configure SSL certificates for secure communication
- Execute
sudo certbot --nginxand follow prompts - Choose appropriate options for HTTPS activation
- Verify HTTPS:
- Test your domain in the browser using HTTPS, paste your link into the browser with HTTPS
Changing Code and Deployment Updates
- VSCode Changes:
- Before updating, run
git pullto sync changes - Make code changes and test using Docker Desktop
- This will synchronize your code changes that you have tested locally
- Before updating, run
- Deployment Update:
- Once all code changes are up to date, commit and sync changes or
git pushfrom the terminal
- Once all code changes are up to date, commit and sync changes or
Pulling Changes into AWS EC2
- AWS EC2 Terminal:
- Navigate to your repo:
cd ~/my_unique_name - Stop the server:
docker-compose down- should cause 502 Bad Gateway - Pull changes:
git pull - Rebuild and start the container:
docker-compose up -d --build
- Navigate to your repo:
Optional Troubleshooting Checks on AWS EC2
- Check Server Status:
- Check the status of your website
- Use commands like
curl localhost:8---anddocker-compose psfor verification
DNS
- Domain Name System (DNS) is a naming system for computers, services, and other resources on the Internet
- Analogy
- Examples you might be familar with: nytimes.com, espn.com, etc.
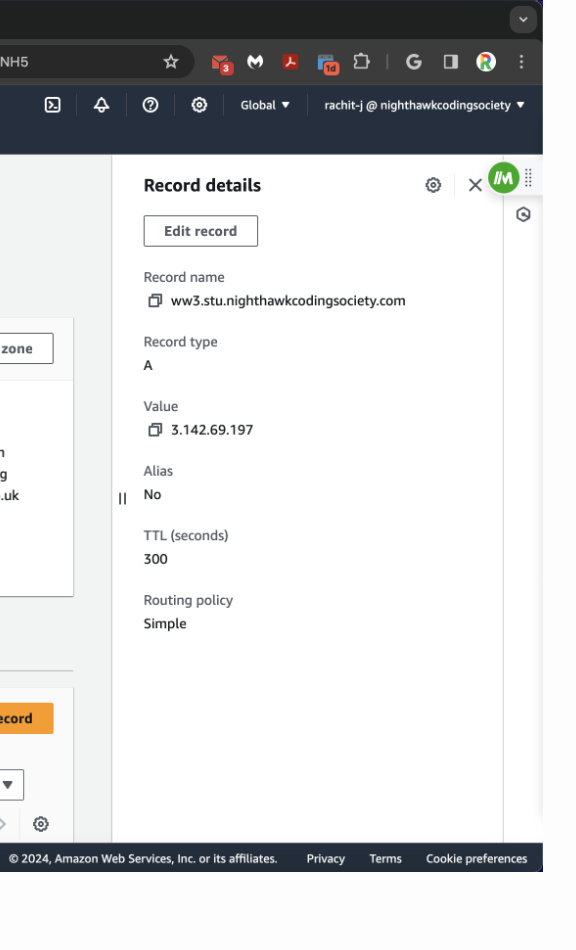
- With Amazon Route 53 specifically (what we use on AWS), we can translate something like example.com to numeric IP addresses, shown below:
- DNS System controls which server an end user will reach when they type a domain name into their web browser (known as queries)
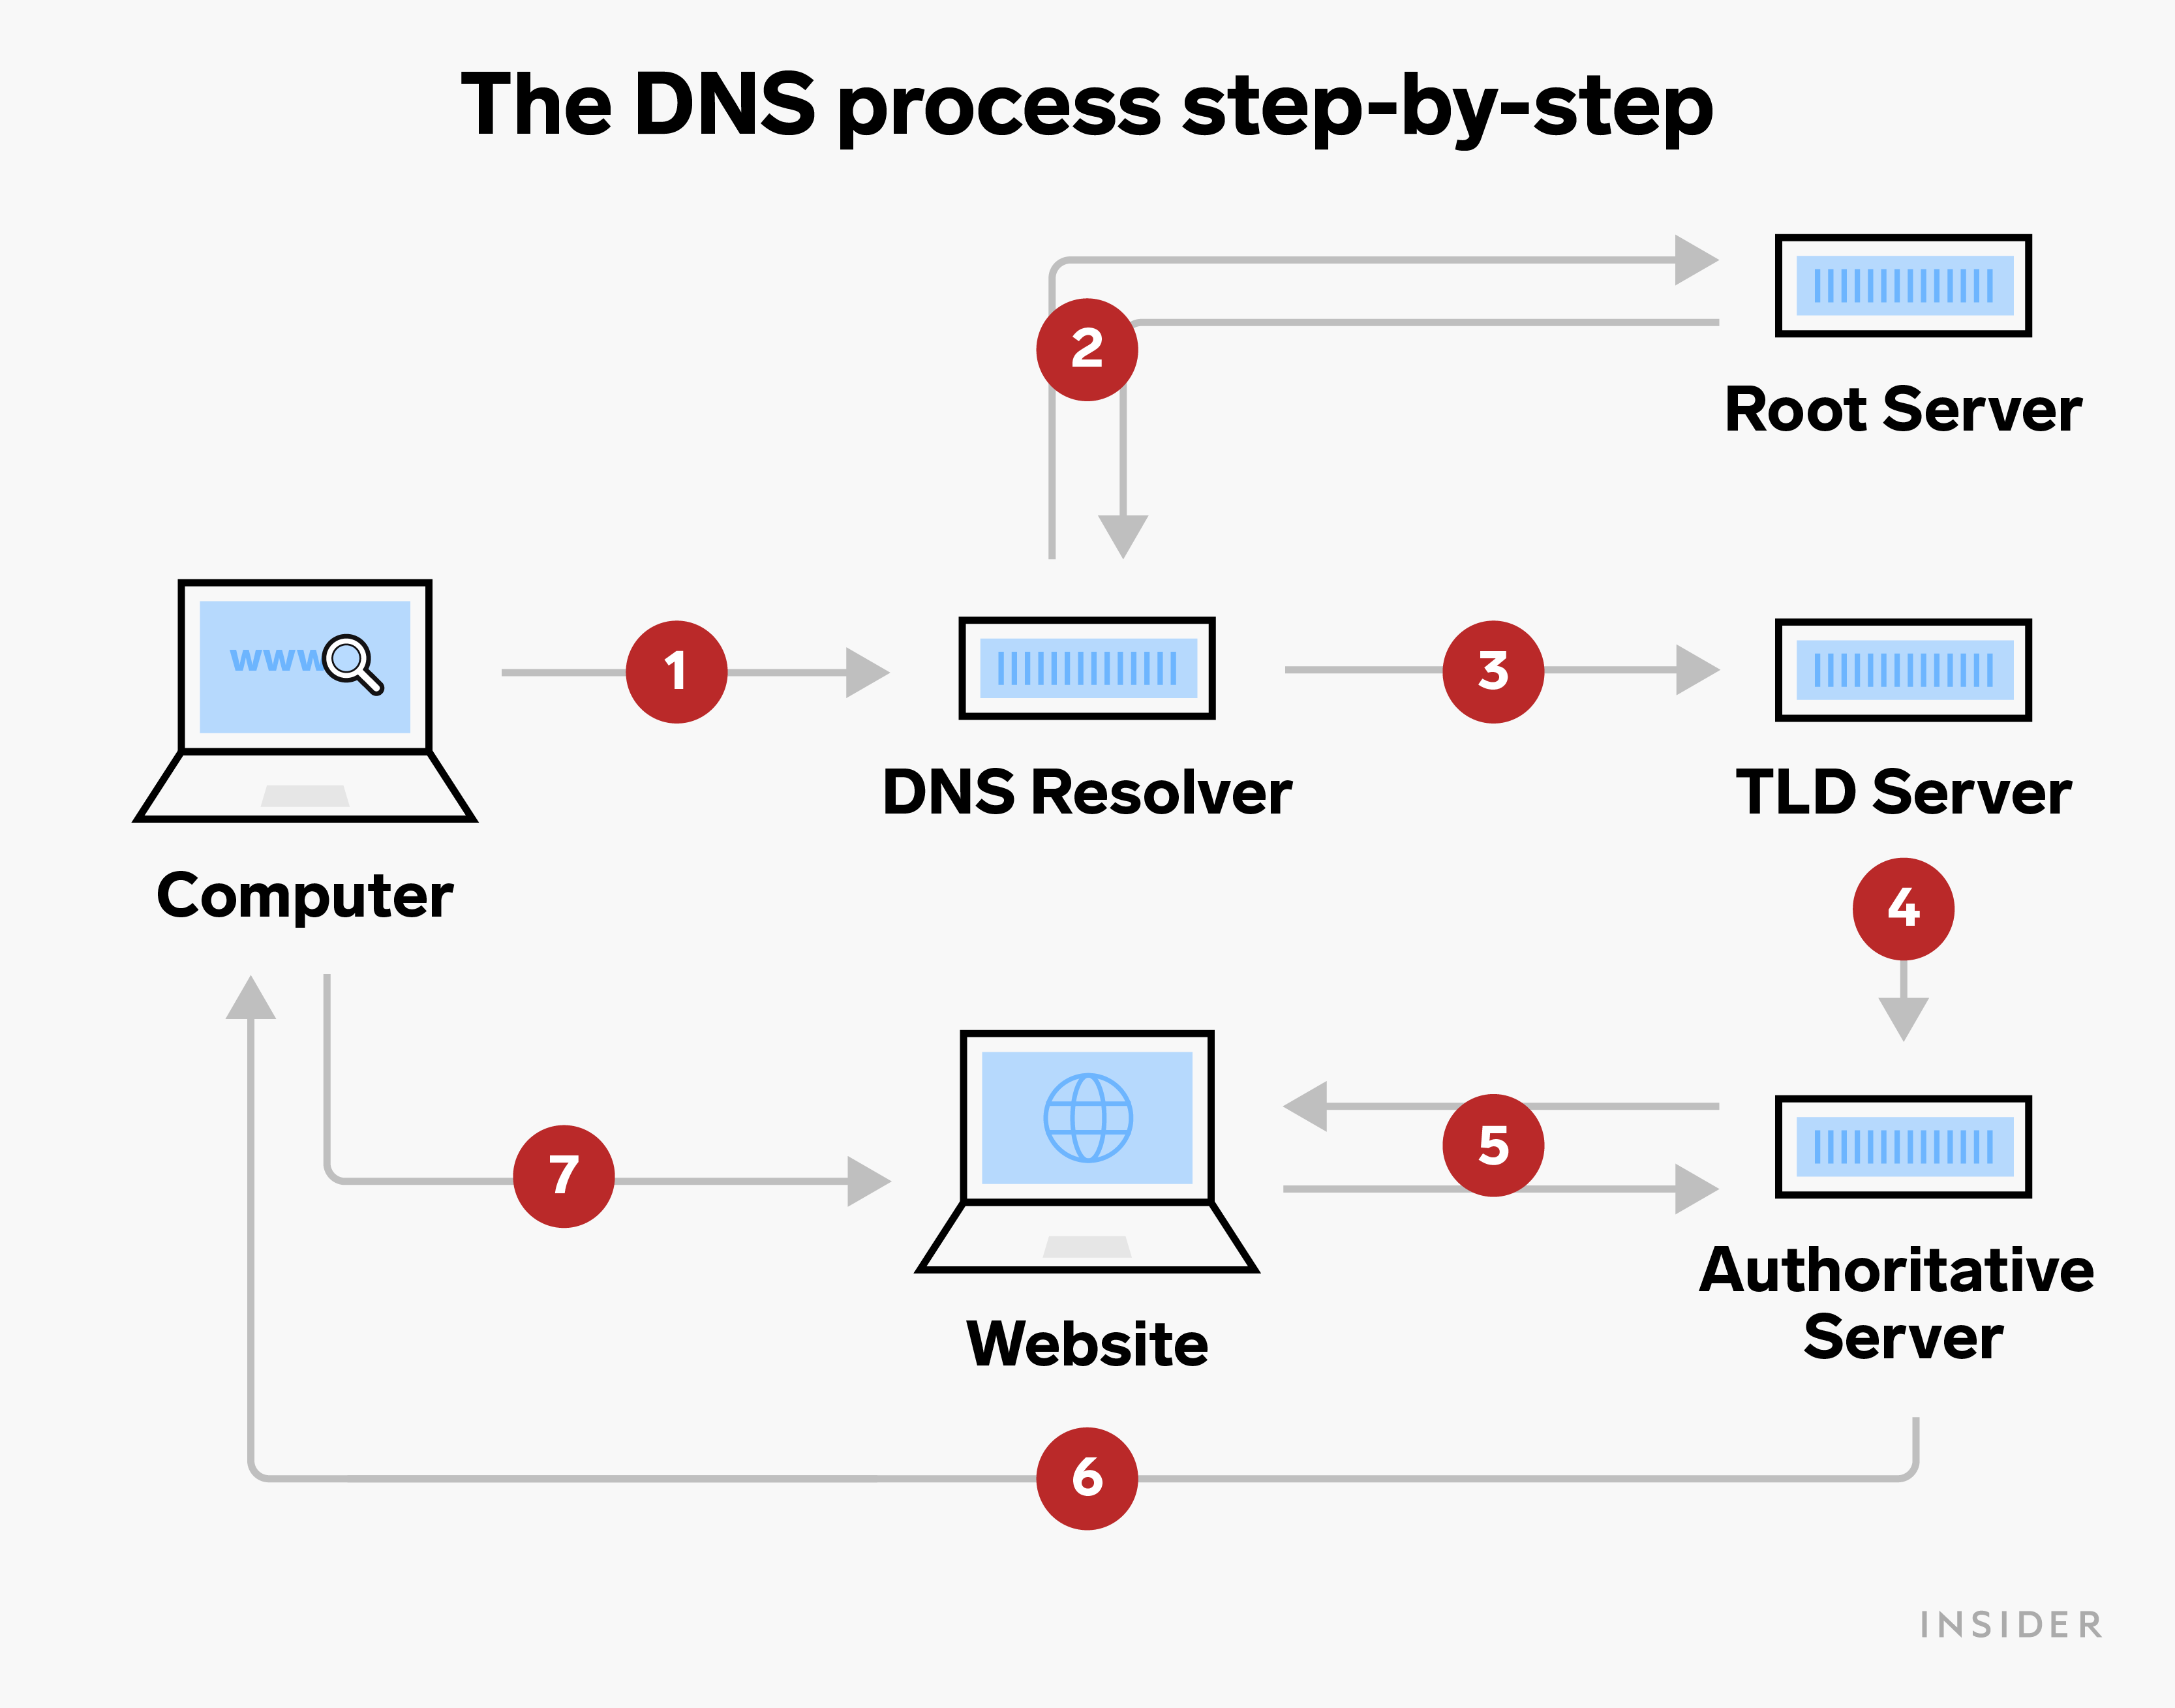
Here’s a diagram that can help you visualize the DNS process:
Breakdown of the process:
- Asks a server (DNS recursive resolver) to find the unique number (IP address) linked to the website typed in (ex nytimes.com)
- Checks the website’s main category (Top Level Domain) using a master server (root nameserver) that lists all websites in each category
- Requests the specific category server (TLD nameserver) to locate the correct unique number (IP address)
- The category server gets the unique number and passes it to the main website server (authoritative nameserver) to confirm it’s right
- The main website server contacts the number and waits for a correct reply to confirm it’s the right one for the website you need
- If the unique number is right, the main website server sends it back to your internet browser
- Your web browser receives the correct unique number and starts loading the webpage!
Nginx
What is Nginx?
- Web server used for…
- Load balancing
- Reverse proxying
- Caching
- Can be configured as an HTTP server
Why is it important?
- Nginx provides features to advance security
- ex. SSL/TLS termination, important for encrypting data in transit
- With its caching capabilities, it can reduce the load on application servers -> improve response times -> optimize performance
- Works well with Amazon EC2 for hosting
Certbot
What is Certbot?
- Certbot is a client that changes an HTTP site to an HTTPS (HTTP with encryption and verification) site
- Automates process of obtaining and installing SSL certificates from Let’s Encrypt
- Overall, Certbot is a client that simplifies the process of enabling HTTPS on a website
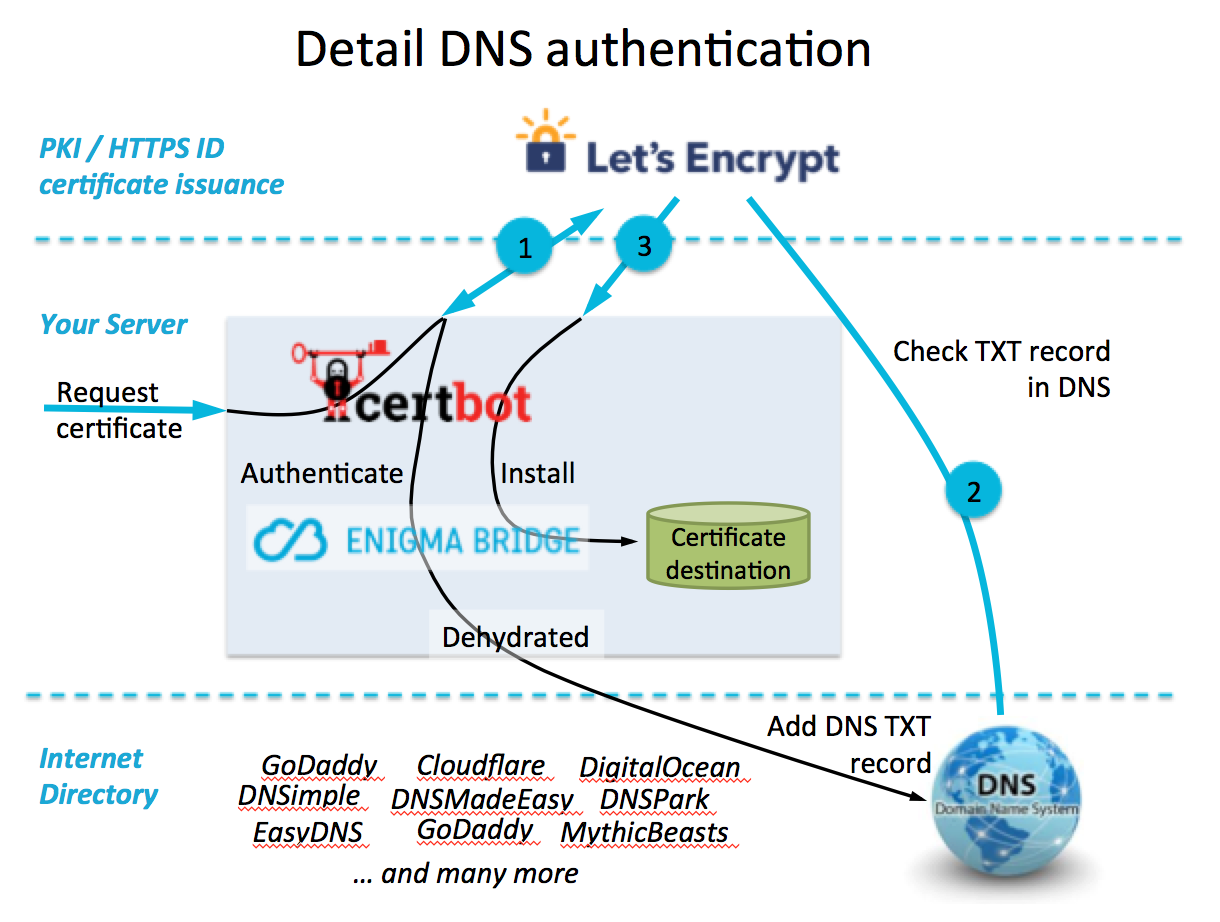
Here is a diagram to help visualize how Certbot works:
Why is Certbot important?
- Secures web traffic between the server and clients
- Reduces manual effort of obtaining and installing SSL certificates
- Websites with HTTPS more trusted by users, essential for handling sensitive data
- Cost-efficient solution for implementing SSL/TLS, especially beneficial for personal websites
- Overall promotes a more secure and trustworthy Internet


